


7.8 Ülesanne: Seadistatavad lampide olekud
Juhtpaneeli kirjeldus
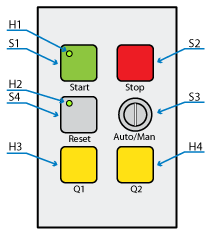
Juhtpaneelil on 3 nuppu (S1 - Start, S2 - Stop, S4 - Reset), üks võtmega lüliti (S3 - Auto/Man) ja 4 indikaatorlampi (H1, H2, H3, H4).
Ülesande püstitus
Koostada järgnev programm. Rakendusel on 2 režiimi - kui lüliti S3 on MAN asendis, siis on rakendus seadistusrežiimis ja kui lüliti S3 on AUTO asendis, siis on rakendus töörežiimis.
Töörežiim
Töörežiimis lülitab rakendus pärast ühekordset START nupu vajutust 1s intervalliga seadistusrežiimis seadistatud 2 .. 255 (ütleb juhendaja/õpetaja) lambide kombinatsiooni vahel samas järjekorras, nagu need seadistusrežiimis määrati.
Kui eelseadistatud kombinatsioonid on pärast START nupu vajutust lõpuni esitatud või on esitamise ajal STOP nuppu vajutatud, peavad kõik lambid kustuma. Tsükkel peab olema korratav uue START nupu vajutusega.
Seadistusrežiim
Seadistamisrežiimis saab RESET nupu hetkelise vajutusega valida, millise lambi olekut seadistatakse. lambide valik peab toimuma järjekorras H1, H2, H3, H4. Uue kombinatsiooni seadistusse sisenedes peab olema automaatselt valitud H1. Valitud tuli peab seadistusrežiimis vilkuma sagedusega 1Hz. Kustunuks seadistatud tuli peab vilkuma 20% töötsükkliga. Põlevaks seadistatud tuli peab vilkuma 80% töötsükkliga. Pärast viimase lambi valimist RESET nupule vajutades peab lambi valiku tsükkel otsast peale algama.
Lambi põlevaks seadistamiseks tuleb seadistusrežiimis vajutada korraks START nuppu ja lambi kustu seadistamiseks tuleb seadistusrežiimis korraks vajutada STOP nuppu. Lambi seadistust peab olema võimalik korduvalt muuta.
RESET nuppu seadistusrežiimis 2s all hoides peab lambi vahetamise asemel algama järgmise lambide kombinatsiooni seadistus, mis toimub sama moodi nagu esimese kombinatsiooni seadistus.
Seadistusrežiimis viimase kombinatsiooni juures olles peab kombinatsioonivahetuse käsk (RESET nupu 2s all hoidmine) seadistamiseks taas esimese kombinatsiooni valima.
Lampide kombinatsiooni seadistusse sisenemisel peavad indikaatorlambid H3 ja H4 vilkuma nii mitu korda kui mitmenda kombinatsiooni juurde on seadistusprotsess jõudnud. Pärast seda peab eelkirjeldatult vilkuma jääma vaid valitud lamp.
Seadistusrežiimist peab saama igal ajal väljuda lüliti S3 tagasi lülitamisega töörežiimi. (AUTO) Seadistusrežiimis viimati seadistamata jäänud lambid peavad jääma kustunuks.
Programm ei tohi nuppude allhoidmisel nupuvajutust mitmekordselt registreerida.
7.8 Exercise: Adjustable status of the lights
Description of the control panel
The control panel has three buttons (S1 – Start button, S2 – Stop button, S4 – Reset button), one key switch (S3 – Auto/Man (in normal state, it is on Auto)) and 4 indicator lights (lamps) (H1 – Start light, H2 – Reset light, H3 – Light Q1, H4 – Light Q2).
Description of the exercise
Write a program based on the following application description. The application has two modes:
- When the key switch S3 is in the position MAN, then the application set-up mode is active.
- When the key switch S3 is in the position AUTO, then the application run mode is active.
Run mode
By pressing the START button in the application run mode, the lights are switched according to previously defined light status (on or off) combinations in an interval of 1 sec. The lights status combination order must be the same as it was in the set-up mode. The application must have 2..255 (says the tutor/teacher) adjustable lights status combinations, which can be set (selected) in the application set-up mode.
The lights are switched off when the STOP button has been pressed. The STOP button has to work also when the lights status presentation cycle is running. The cycle has to be repeatable when pressing the START button again.
Set-up mode
In the application set-up mode the RESET button allows selection of the light which status is going to be changed. The lights should be selected as H1, H2, H3, and then H4. When the light H4 status setting is active, then by pressing the RESET button, the light selection cycle should start from the beginning (light H1). When starting to set up a new lights status combination, then the light H1 must be selected automatically.
In the set-up mode, the selected light has to flash with a frequency of 1 Hz. If a light status has been set off, then it has to flash with a duty cycle of 20%. However, by status on, the light has to flash with a duty cycle of 80%.
The START button is used in the set-up mode to switch a light on (status on) and the STOP button to switch it off (status off). The light status (on or off) selection must be repeatable.
When pressing and holding the RESET button for 2 sec in the set-up mode, a new lights status combination is selected. It should not select a new light for the current lights status combination. The new lights status combination set up should work similar to the previous one.
If the last lights status combination is active and a new lights status combination should be selected (the RESET button has been held for 2 sec), then the first lights status combination has to be selected (starting from the beginning).
The lights H3 and H4 have to flash as many times as is the number of the newly selected lights status combination. This flashing is happening only when a new lights status combination has been selected. After that only the light, which status is going to be changed, is flashing.
It must be possible to exit the set-up mode at any time by turning the key switch S3 to run mode (AUTO). All the remaining lights in the lights status combination and in other lights status combinations, which where not configured in the last set-up mode, have to be set off (status is off).
The program should not register a button multiple times when it is pressed and held down.
